Monday 24 December 2007

merry christmas

merry christmas to all


Trying desparately to get in a better Christmas mood! Royal Mail sneaked in a delivery card at 7:15am, never heard them so have just had to trudge down to the sorting office with DD in tow to pick up a huge Amazon box and carry it up the road!
Never mind, we are going bolwing this afternoon so should have fun then!

Made some money envelopes yesterday and finally got around to doing a scrapbook for my SIL who "quite" likes Lee Meade LOL

Sorry the photos are rubbish but the camera battery died and Robert has "tidied" away the charger somewhere when he put the Christmas tree up..you get the general gist anyway... there are five more monochromatic pages in green, pink, purple, orange and blue as well as the two shown. I hope she likes it.


Have a great Christams everyone!

Thursday 6 December 2007

Sneak peak of tonight's class

3 for 1 tonight....

An accordian album...

A maze book calendar...

...
and a star shaped decoration style thing!

Sunday 2 December 2007

Kenny meets Padraig Harrington!

Bit of a change from the usual craft related stuff today LOL.

Kenny came home from his golf lesson today as high as a kite. Apparently Padraig Harrington had been there with his coach Bob Torrance (who is local to Largs) and was practicing on the same driving range as Kenny. He then said to Kenny and the other boy who is also taking lessons to come round and watch. Kenny was very impressed that Padraig could hit the ball as far with an iron as his own coach could hit it with a driver.

He also got to see the claret jug that was sitting in the same room where they leave all their jackets etc.

Thursday 29 November 2007

Kirsten's Nellies and Tildas

Kirsten is almost as addicted to these stamps as me...actually probably more as she refuses to make them into cards but gives them all names and keeps them on her bedside table to keep her company in the night LOL

I love how she added the beads and beard to the Pirate to make it like Cap'n Jack Sparrow.


Some Sugar Nellie cards (and maybe a Magnoila one too )

I have had the best day today! Went to see a new quiz show "The Kids Are All right" being filmed at the BBC today with none other that the gorgeous and talented John Barrowman (Torchwood/Dr Who) as the host. What can I say...he is even more gorgeous in real life, a total gentleman and just all round nice guy.
Look out for me on prime time Saturday night TV as an audience member soon :D

I finally had a chance to play with my gorgeous Sugar Nellie stamps this week that I got from Funky Kits (link in sidebar).

Had so much fun with these and there are some new ones out soon as well :)

Winter Girl Nellie


Winter Boy
Cutest nellie :)

Aaaar Nellie!
Flowery Nellie
Sweeping Edwin (Magnolia)

Haarlem 16-18 November

Another fab time at Scrapaganza...this time in Haarlem.

Havent actually finished any of the projects yet, although the acrylic album is almost done so in the meantime here are a few photos of Haarlem.

Town centre
Fresh bread

Flower stalls
And last but not least here is a photo of our gingerbread house we made as part of the fun on the Saturday party night. So glad it ended up going to a good home Mary :)

Boxes template - for Mary :D

Take your 12 x 12 cardstock (plain or patterned) and score it at 2" intervals so you end up with a grid of 36 squares (I've just drawn in the lines so it shows up better on the photo but you don't have to! )

Then cut out the two boxes as shown including the flaps where indicated and glue together.

Have no idea why DS sniggered when he saw this (insert rolling eye/wry smilie here!!!!)

Friday 2 November 2007

CHRISTMAS PLANNER Class - Paper Bag Book


As usual I am more than happy for anyone to use the following instructions for their personal use but please do not copy them (either to teach your own classes or to post elsewhere online) without permission.
Thank you :)

STEP 1

Paint chipboard title with green paint. When dry decorate with Stickles green glitter paint.

Decorate flower with Stickles paint if preferred.

Fold all three bags in half. Open them up and layer as follows:

Bag 1 (bottom) – opening to your left

Bag 2 (middle) – opening to your right

Bag 3 (top) – opening to your left.

Fold each bag in half. Using a pencil mark 4 holes approx 1” apart and ½” in from the edge. Punch holes using cropodile or hole punch.

STEP 2 – Reminders pages

Cut out calendars & words from pre-printed sheet.

Doodled, striped paper – cut two pieces 5”w x 4 ½”h

Red dot paper – cut two pieces 5”w x 3”h

Attach red dot piece to stripy piece with tape on three sides leaving top side open to make a pocket – make sure the tape is right to the edge so that your calendar fits in.

Punch hole in calendars & add ribbon.

Round edges and attach to pages. Punch holes through patterned paper. We will finish the decoration later.

STEP 3 – Presents pages


Words & doodle paper – cut out the word “Christmas” and put to one side.

Then cut two squares 4 ½” x 4 ½”

Red dots – cut two pieces 4” x 2 ½”

Green card - cut two pieces 4” x 2 ½”

Stamp green card with notebook stamp

Round all edges.

Layer dotty paper, then stamped pieces at an angle.

STEP 4 – Cards pages

Stripe paper – cut two pieces 4 ½” x 4 ½”

Cut out two star shapes using the star punch. (Put stars to one side for now)

Cut two pieces of red dot paper as big as the stars and attach behind the striped paper.

Cut two pieces of white cardstock 4” x 2 ½” and stamp with notebook stamp

Round all corners and attach to page as shown

STEP 5 – Food pages

Red dots – cut two pieces 4 ½” x 4 ½”

Doodled stripes – cut two pieces 4 ½”w x 1 ½”h

Red cardstock – cut two squares 3 ½” x 3 ½”

Draw lines on red cardstock & add Christmas tree brad to lower right corner.

Round corners and attach to pages as shown.

STEP 6 - Events

Doodled stripes – cut two pieces 4 ½” x 4 ½”

Red dots – cut two pieces ½”w x 4 ½”h

Green cardstock – cut two pieces 4” x 2 ½”

Punch two stars from red cardstock. And another one from green cardstock (put the green one to one side for now)

Round corners and attach to pages as shown.

STEP 7 – finishing off & cover

Cut two circles from red cardstock and attach to “Reminders” page along with striped stars as illustrated.

******************************

Cut one further circle from red cardstock, one from green cardstock and one from the doodled strip paper.

Cut the two cardstock circles (ie red & green) in half.

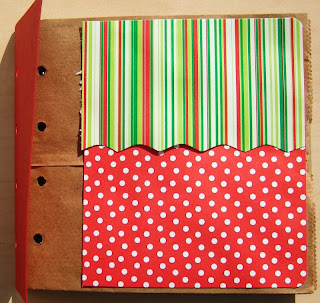
Striped paper – cut piece 4”w x 3”h

Dot paper – cut piece 4”w x 3”h

Trim striped paper with decorative edge scissors

Attach green half circle to lower edge of cover.

And attach patterned paper on top

STEP 8 - cover

Red card stock – cut piece 5” x 5”.

Fold in half and punch holes to match paper bag book

Attach to outside pages using double sided tape as shown.

Bind book using fibres – double knot each one.

Attach circle, star, flower, “Christmas” and chipboard title to cover as shown

STEP 9 - Tags

Green cardstock – cut two pieces 4 ½” x 4”

Red cardstock – cut one piece 4 ½” x 4”

Attach circles at varying positions along longer length.

Decorate tags with small strips of patterned paper


Monday 22 October 2007

Assorted stuff...and yes some more Magnolia cards :)

The best laid plans and all that... despite some good intentions I only managed to complete one of the classes for the UKS cyber crop. Mind you it was good 'un. Box of Treasured Memories by Margaret at Artbase. Loved this idea. I hadn't bought the kit but managed to make the box quite easily from a sheet of A4 chipoard.

I did get around to making my Halloween banner though. Have been meaning to do this for a while so am pleased I managed to get it done with time to spare. This is based on a class taught by Lance Anderson of Rusty Pickle. I used the RP Random Alphabet mainly. Painted the stencil pieces black & orange and then backed with green and purple cardstock.


Made this card for one of my DDs friends. Paper is Making Memories.

And this one uses some papers from Dena Designs.
And one more...

These are some of the images I got from the Magnolia stamp swap on UKS. Patterned paper is by K&Co and I painted the wall myself :)
Finally... a work in progress. This is my planner for Scrapaganza next month. I have done the covers but will get around to the inside pages now I have finalised my schedule. I have designed it to be reusable. The scrapaganza tag can come off and the inside pages can easily be replaced. Plus it is MUCH lighter and smaller than my last one LOL

Sunday 21 October 2007

Sneak Peek

This will be the next Project class I am teaching at PaperCuts on Thursday 1 November

Friday 19 October 2007

STAR BOOK ~ Class Instructions ~

As usual I am more than happy for anyone to use the following instructions for their personal use but please do not copy them (either to teach your own classes or to post elsewhere online) without permission.
Thank you :)


STEP 1

Cut cardstock as follows:

Cover (red cardstock): 5 1/8” x 12”

Innermost pages (green cardstock): 5” x 11 ½” (x 5 pages)

Outer pages (red cardstock): 5” x 10 ½” (x 5 pages)

Score cover (texture side down) 5 ¾” from each edge to form a spine ½” wide

Score all other pages in half (ie at 5 ¾” on the green cardstock and 5 ¼” on the red cardstock) – textured side up.

STEP 2

Adhere double sided tape to one of the short edges of each piece of green cardstock

Join pages together to form a VVVVV shape as shown.

Adhere double sided tape to each of the short edges of the red cardstock.

Ink all edges

STEP 3

It is easier to decorate the pages before attaching them to the book.

Cut 2 pieces of circles paper 4 ½” x 3 ½”

Cut 2 pieces of green cardstock 3” square.

Round corners, ink edges and attach to page.

STEP 4

Cut two pieces of red patterned paper to 5” x 4 ½”

Score at ½” from each side.

Cut two pieces of circle paper 4” x 4 ½”

Emboss two 1 ½” x 4 ½” strips of red cardstock using cuttlebug snowflake embossing die.

Attach red patterned paper to page to form a flap and cover join with circle paper.

Punch two holes on each page as shown and thread fibre/ribbon through.

STEP 5

Cut 2 pieces of striped paper 3” x 4 ½”

Cut 2 pieces green paper 2” x 4 ½”

Cut 2 squares 2” x 2” from red cardstock and emboss with Christmas design.

Attach to page as shown (I only attached the two outer edges of the red cardstock so a photo can be slipped underneath later if required)

STEP 6

Cut 1 piece of striped paper 4½” x 4½”

Cut 2 pieces circle paper – one 4½” x 4½” and one 2½”x 4½”

Attach to page to form pocket

Cut tag 3”x 4½” from red patterned paper.

Punch hole and add fibre/ribbon.

STEP 7

Cut two 4½ ” x 4½” squares from red patterned cardstock.

Place patterned paper to patterned paper and cut zig-zag or wavy line.

Attach one patterned piece and one plain piece to each page


STEP 8

Attach each red cardstock page to the green cardstock pages – the page will only be attached at the outermost edge and will NOT lie flat

Attach lengths of ribbon to the outside pages (green cardstock) using double sided tape.

Decorate cover with 2” x 5 ¾” embossed strip of green cardstock and die cut stars.

Stamp Merry Christmas on small piece of blue card and attach over embossed strip

Attach stars with foam pads to give dimension.

Attach cover to green cardstock with double sided tape on short edges only.