As usual I am more than happy for anyone to use the following instructions for their personal use but please do not copy them (either to teach your own classes or to post elsewhere online) without permission.
Thank you :)
 STEP 1
 Paint chipboard title with green paint. When dry decorate with Stickles green glitter paint.
Decorate flower with Stickles paint if preferred.
Fold all three bags in half. Open them up and layer as follows:
Bag 1 (bottom) – opening to your left
Bag 2 (middle) – opening to your right
Bag 3 (top) – opening to your left.
Fold each bag in half. Using a pencil mark 4 holes approx 1” apart and ½” in from the edge. Punch holes using cropodile or hole punch.
STEP 2 – Reminders pages
Cut out calendars & words from pre-printed sheet.
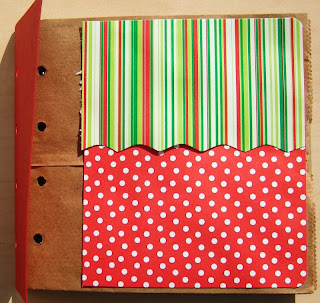
Doodled, striped paper – cut two pieces 5”w x 4 ½”h
Red dot paper – cut two pieces 5”w x 3”h
Attach red dot piece to stripy piece with tape on three sides leaving top side open to make a pocket – make sure the tape is right to the edge so that your calendar fits in.
Punch hole in calendars & add ribbon.
Round edges and attach to pages. Punch holes through patterned paper. We will finish the decoration later.
STEP 3 – Presents pages
Words & doodle paper – cut out the word “Christmas” and put to one side.
Then cut two squares 4 ½” x 4 ½”
Red dots – cut two pieces 4” x 2 ½”
Green card - cut two pieces 4” x 2 ½”
Stamp green card with notebook stamp
Round all edges.
Layer dotty paper, then stamped pieces at an angle.
STEP 4 – Cards pages
Stripe paper – cut two pieces 4 ½” x 4 ½”
Cut out two star shapes using the star punch. (Put stars to one side for now)
Cut two pieces of red dot paper as big as the stars and attach behind the striped paper.
Cut two pieces of white cardstock 4” x 2 ½” and stamp with notebook stamp
Round all corners and attach to page as shown
STEP 5 – Food pages
Red dots – cut two pieces 4 ½” x 4 ½”
Doodled stripes – cut two pieces 4 ½”w x 1 ½”h
Red cardstock – cut two squares 3 ½” x 3 ½”
Draw lines on red cardstock & add Christmas tree brad to lower right corner.
Round corners and attach to pages as shown.
STEP 6 - Events
Doodled stripes – cut two pieces 4 ½” x 4 ½”
Red dots – cut two pieces ½”w x 4 ½”h
Green cardstock – cut two pieces 4” x 2 ½”
Punch two stars from red cardstock. And another one from green cardstock (put the green one to one side for now)
Round corners and attach to pages as shown.
STEP 7 – finishing off & cover
Cut two circles from red cardstock and attach to “Reminders” page along with striped stars as illustrated.
******************************
Cut one further circle from red cardstock, one from green cardstock and one from the doodled strip paper.
Cut the two cardstock circles (ie red & green) in half.
Striped paper – cut piece 4”w x 3”h
Dot paper – cut piece 4”w x 3”h
Trim striped paper with decorative edge scissors
Attach green half circle to lower edge of cover.
And attach patterned paper on top
STEP 8 - cover
Fold in half and punch holes to match paper bag book
Attach to outside pages using double sided tape as shown.
Bind book using fibres – double knot each one.
Attach circle, star, flower, “Christmas” and chipboard title to cover as shown
STEP 9 - Tags
Green cardstock – cut two pieces 4 ½” x 4”
Red cardstock – cut one piece 4 ½” x 4”
Attach circles at varying positions along longer length.
Decorate tags with small strips of patterned paper


6 comments:
WOW! Thats wonderful!
Thanks to visit my blog!
All your stuff is lush Maggie, just gorgeous x
Jacqui
x
I'd like permission to use your tutorial to teach a church class how to make these, but I don't know how to get a hold of you!
Oh I really like this Christmas Planner - I made one too and I'll put a link from my blog to yours!
Greetings from Germany
kwebbel
Great work done in this post and the paper bag book is really nice idea. You are also explain all the things in detail that would help us to understand easily.
WOW! That,s wonderful!All your stuff is so nice & so cute.Thank,s for great post.
Plastic Card.
Post a Comment