Friday, 27 July 2007

Blooming great class!!!


I know, I know what a cheesy title!

...but hey I did have a great class last night. We had three new people starting so that brings our regular total up to 7 (plus we have had people on holiday who just come for the one week) and we have another 2 ladies starting next week as well. I am so happy with how it is going, everyone seems to be pleased with their layouts and all the techniques we are covering and what's more I am really enjoying teaching. When I started I worried that a class every week might be a big commitment but it really is a lot of fun.

Julie has also asked me to come along and do some makes & takes at the SECC in October so I will have to get my thinking cap on for that too.

Anyway I am off out with the "girls" tonight so no time to type up the class instructions this week. If anyone wants them please leave a comment below and I will email them over to you.

Wednesday, 25 July 2007

Rockin Girl


Yaay I am officially a Rockin Girl LOL LOL - thanks Jane :D


OK I tag

Angela
Roz
Dawn
Sam

to become Rockin Girls too

Monday, 23 July 2007

Scrapbook Inspirations Sketch Challenge

This is the layout I created a while ago for the sketch challenge in Scrapbook Inspirations magazine. Sorry the scan is rubbish but I was in a rush to get it done - I think Cheryl emailed me with the sketch on a Tuesday with a deadline of the following Tuesday...however I was off on holiday on the Thursday so I only had a day and a half (during which I was at work!!!) to get it done and emailed off...so no time to scan neatly (and too dark to get a decent photo at night!)


To make the title I printed it off on an ordinary sheet of A4 paper ( the font is Fabulous 50s) and then used a paper piercer to transfer the letters to the cardstock before stitching.

This was the burn on Wednesday late afternoon after the thunderstorm (we all got soaked...no jackets!). Thank goodness it never got any higher (in fact it was amazing how fast it went down to normal levels once the rain stopped...no more than 2 -3 hours)


And this is how the burn usually looks (photo taken yesterday afternoon)


Wednesday, 18 July 2007

Wedding Layout Class


As usual I am more than happy for anyone to use the following instructions for their personal use but please do not copy them (either to teach your own classes or to post elsewhere online) without permission. Thank you :)

MATERIALS

Cream cardstock
EK Success I DO Heart & Soul Paper
EK Success I DO Sentiments Paper
12" piece of cream lace
8" piece sheer gold ribbon
Lil Davis Love Affair 2 stamps
Clear Embossing Pad
Gold Embossing Powder
Gold Gel pen
3 different size chipboard hearts (mine were cut using a Big Shot die)
Dark red acrylic paint

STEP 1

Stamp pattern down left hand side of layout and emboss using gold embossing powder.

STEP 2

Make your title from the “Sentiments” paper by going over one of the words with a gold gel pen. (there are lots to chose from like the “Bouquet of Roses” used in the example or “Adore”, “Romance” “Candle Light” etc etc )

Cut out and round corners if desired.

Cut the “Heart & Soul” paper into two strips. One should be 3 ½ ” x 12” and the other 6” x 12”.

Cut the edge of each strip with scalloped edged scissors (or any other shape)

STEP 3

Mat your photo on the Sentiments paper. Leave a larger margin at the bottom and edge with scalloped scissors (or whichever shape you chose for the other papers)


STEP 4

Paint the large heart dark red.

Cover the medium heart with the “Sentiments” patterned paper (remember to glue the front of the chipboard heart to the back of the patterned paper), and cut around the chipboard edge with a sharp craft knife.

Cover the small heart with either side of the “Heart & Soul” paper.

Glue the hearts together.

Tie a 2” to 3” piece of the gold ribbon round a slightly longer piece and then wrap round all three hearts. Secure at the back with some double-sided tape.


STEP 5

Attach lace to left hand side of the layout just beside the embossed design.

Add patterned paper as shown.

Attach photo leaving the right side open for the journaling tag

Add title (using pop dots or foam pads) and heart embellishment

Cut a piece of paper approx 5” x 2 ½” from the “Heart & Soul” paper.
Make a small slit and attach ribbon. Slide under photo mat.

BOYS!!!!

Kenneth & Kirsten were niggling each other yesterday morning and after a while (OK more like 5 minutes!) I had had enough. "Say something nice about each other for a change", says I.

So Kirsten dutifully thinks for a minute then says "Kenneth sometimes you are kind and give me things"

Kenneth mulls it over for a while longer then says "Kirsten, sometimes when you fart it doesn't smell!"

Enough said!

Monday, 16 July 2007

Big Shot Thick Cuts dies for sale

I am selling the following Big Shot Thick Cuts dies for £10 each plus £1 P&P (within UK)
Leave me your contact details in the comments space if you are interested. Paypal payment required.


BagEnvelope ~2

Square envelope
Popcorn Box

Purse


This looks interesting.....


Think I will have to order one (well I did miss out on the Autimn Leaves one)

Sunday, 15 July 2007

Yum - new Rusty Pickle Line

I absolutely MUST have this new line from Rusty Pickle. No idea what for, probably just to look at but nonetheless it is calling to me! Would love it if Mr Pickle did a class using this line at the next Scrapaganza.

Thursday, 12 July 2007

Summer Fun Class

As usual I am more than happy for anyone to use the following instructions for their personal use but please do not copy them (either to teach your own classes or to post elsewhere online) without permission.

Most of the supplies to make the LO can be ordered online from Julie or Ian at PaperCuts


Materials

Doodlebug Pastel Taffy Stripes
Doodlebug Pastel Wildflower
Doodlebug RickRack - Bumblebee
Doodlebug Tokens - Spring
White cardstock
Golden yellow paint
Small piece yellow embroidery thread
Paperclip
Small piece co-ordinating ribbon

Butterfly Template * ( I resized mine to make it a bit smaller)
Transparency title *


STEP 1

Cut 1 piece of the stripy paper 5 ½" wide x 10" long (the stripes should go across the way as shown)

Cut 1 piece of flowery paper – approx 5” x 7”

Round one corner of each piece as shown using a corner rounder.


STEP 2

Cut out your butterfly template. *

Fold one small piece of the flowery paper. Place your template on the fold. Draw round and cut out.

Do the same with two small pieces of the striped paper.

Use a paper clip and a small piece of ribbon to make a “body” for one of the butterflies.


STEP 3

Dry brush the edges of your patterned paper with Golden Yellow paint, including the three butterflies.


Adhere your patterned paper to the white cardstock as shown.

- The striped paper is 1” from the top & bottom of the page and about 1 ½” in from the left hand side.

- the flowery paper is about 2 ½” from the bottom of the page and 1 ½” in from the right hand side.

Add photo(s)STEP 4

Cut your Summer Fun transparency in a circle. *

Paint the back of this with Golden Yellow paint and attach to your layout, overlapping your photo.

Paint the back of the second transparency embellishment * and attach below the flowery paper.

The paint will act as an adhesive for your transparencies.


STEP 5

Attach yellow ricrac (wavy ribbon) using double sided tape.

Tie a small piece of embroidery thread on to the token and attach to layout.

Write your journalling on three different colours of the striped paper and attach to layout, overlapping photo.

Attach butterflies using double sided tape. Leave the edges “unglued” so the wings can be folded up slightly for a 3D effect.

* I am happy to email the butterfly template and the transparency page to anyone that wants them. Please leave your email details in the comments box and I'll get back to you as soon as I can :)
Just thought I would post a few photos from our recent trip to Yorkshire - weather looks surprisingly sunny - clearly I was too busy running to get out the rain to take any photos during the monsoon like showers!!! LOL


This is Kenneth & Kirsten at Harrogate - I really liked this town and would love to go back for a longer visit some day!
Rare photo of my boy not grimacing whilst having his photo taken.


HA HA - I love this photo - just sums the two of them up. Kirsten too busy posing for a photo and whilst she is doing so Kenny is nicking her chips!!! Photo taken in the original Harry Ramsden's in Guisley.


Kirsten on "Princess" the donkey on Scarborough beach - It started chucking it down about 2 minutes later!


***sigh*** Yes when a sign says "Wet Paint" it really does mean wet paint! Kenny said this was lucky as he was just about to do a roly-poly over the railings so I should be garetful it is only his hands that got paint on them - I am son, I am!!!


Somewhere over the rainbow..... is a caravan in Filey. LOL
Note the lovely clear blue summer sky!

Digging for ancient artifacts and skeletons at York's "Dig" attraction - one of the highlights of our week. Would definitely recommend this.


Outside York Minster

On the sea front at Bridlington


Traditional ice-creams!

Tuesday, 10 July 2007

I've been busy scrapping but most of it is for Angel Crafts design team so all I can share is this little paper bag book I made for some friends of my niece who are over visiting from the US (and who kindly brought some scrapping goodies over for me :D )


Mostly Basic Grey Sublime papers. I also printed some journalling/images on a transparency that I stitched in between the paper bags to make some extra pages.


Some additional supplies came from my freebie pizza box shopping at Scrapagnaza


There was no class last week as I was away on holiday but I will upload the next one towards the end of the week.

If anyone has done either of the first two classes I would love to see your versions. Post a link to your layout in the comments and I will draw a random layout next week (17 July) to win a small goodie bag :)

Friday, 6 July 2007

Hmm I have been tagged by Angela - so here goes "7 facts about me"

1. I love sci-fi particularly anything by Joss Whedon so that's Buffy/Angel/Firefly and I also love Doctor Who, Torchwood, the 4400, Taken, Point Pleasant, Tru Calling.

2. I also love to read and own at least 1,000 books. Favourite authors include Anne Rice, Jean M Auel, Christopher Brookmyre and Tolkien (but I'm reading Kenneth's Doctor Who books at the moment)

3. When I worked in London I completed lots of famous people's tax returns but I can't tell you who 'cos I've signed confidentiality agreements :p

4. Robert and I have been together since I was 17. For my 18th birthday he bought me a gold locket and a single red rose and he took me to Paris (by bus/train LOL) for my first Christmas present from him.

5. My dad's aunt by marriage is Vic Damone's cousin and she sang with frank Sinatra in her father's night club in Queens.

6. I HATE bananas - even the smell makes me feel sick (mind you so does the smell of CK one ever since I was pregnant with Kenneth)

7. I was born on an RAF base (and I wanted to be a pilot when I was younger but couldn't because I am short sighted...if only laser surgery had been around a few years earlier!!!)

*********************************************************************************

We are just back from our week away in Yorkshire so off to unpack and get the washing on. Will post some photos later

Thursday, 28 June 2007

"FABULOUS" CLASS

Class number two :) As usual I am more than happy for anyone to use the following instructions for their personal use but please do not copy them (either to teach your own classes or to post elsewhere online) without permission. Thank you :)


MATERIALS

Green cardstock
Patterned paper:
EK Success Miss Polly's PJ's
EK Success Ringaround a Posie

10" piece pink ribbon
5" piece green ribbon
Fabric flower (double layer)
Bling flower
Heidi Swapp "Fabulous" stamp

TOOLS
Circle Punch or Quickutz circle die
Pop dots
Ink


STEP 1

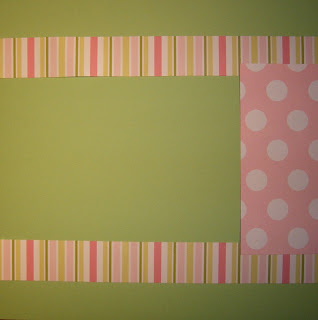
Cut 2 strips of the stripy paper 1 ½” x 12” (the stripes should go across the way as shown)

Cut 1 piece of pink dotty paper – this should be approx 3” wide and the height should be the same height as your photograph(s).

Cut a small piece of pale pink card approx 3 1/2" x 5"

Cut small piece of striped paper the same height as your pink card and approx 1 1/2" - 2" wide


STEP 2

Adhere your patterned paper to the green cardstock as shown.

-
The 2 narrow strips should be about 1 ½” from the top and bottom edges of your layout.

- the pink dotty paper should be placed against the right hand side of your layout midway between the two strips (this will overlap the striped paper);

STEP 3

Add your photographs as shown (below).

DO NOT GLUE the edge of the photograph nearest the dotty paper.

DO NOT USE GLUE in the middle of your photographs…

…as the photos will make a pocket for your journaling tag.


STEP 4

Cut out some flowers from the other side of the pink dotty paper and attach the “half” flowers to the edges of your layout and against the stripy paper as shown.

Use pop dots to attach the “whole” flowers for added dimension.

Tie two pieces of ribbon together and attach along the lower edge of the photographs using double sided tape.

Stamp title

STEP 5

Add fabric flower and sparkly centre using double sided tape.

Use Quickutz die or circle punch to cut two circles from the green paper and attach to the middle of the pink journaling tag. (If you are rounding the corners of you tag do t

Cut a small strip of stripy paper to cover the edge of your journalling tag – (trim one (long) edge with scalloped edged scissors if you wish)

Attach stripy paper and round corners of journaling tag if you wish. Slip tag under photos.


Friday, 22 June 2007

THE GRAFFITI PROJECT ON KELBURN CASTLE

This is absolutely amazing- Kelburn Castle is about 3 miles away from me and I used to work in the cafe there (and sometimes at the Castle too) when I was at school - keep meaning to go up to take some photos but the midgies have been truly awful for the last week or so !!!!.

Thursday, 21 June 2007

Friends Class - Beginner's Layout

Well I taught my first class at my LSS Paper Cuts tonight. It went well and they are coming back for more next week :D

I am more than happy for anyone to use the following instructions for their personal use but please do not copy them (either to teach your own classes or to post elsewhere online) without permission.

Most of the supplies to make the LO can be ordered online from Julie or Ian at PaperCuts

Materials

Brown Cardstock
Patterned Paper - EK Success
Stamps - Making memories Philadelphia foam stamps & Autumn Leaves journalling stamps
Brown ink pad
Quickutz tag
Wavy edged scissors
Co-ordinating fibres or ribbon (small piece)

STEP 1

Cut the brown dotty paper into a 5” x 12” piece
Cut the blue flowery paper into a 7” x 9 ¼” piece
Cut the stripy paper into a 1 ¼” strip (the stripes should go across the way as shown)
Cut the stripy paper into a 6” x 4” piece

STEP 2

Adhere your patterned paper to the brown cardstock as shown below.

As a rough guide:

- the brown dotty paper should be approx 1 ¼” in from the left hand side;

- the blue flowery paper is approx ¾” in from the right hand side and 1 ¼” from the bottom;

- the stripy paper is approx 2” from the top and 3 ½” from the right hand side.

STEP 3

Add your photograph.
And adhere the narrow strip of stripy paper so that this slightly overlaps the edge of your photograph

STEP 4

Stamp your title on the cream paper using assorted stamps.
Cut out each individual letter as shown.

Ink the edges with brown ink if preferred.

Stamp a journaling block on the cream paper and cut out – use scalloped edge scissors if you wish.

Cut a 12” strip from the cream paper using wavy edged scissors to make “faux” ricrac


STEP 5

Attach your title and journaling block to the page.
Cut a small tag from the brown dotty paper.
Write place and date on a small piece of cream paper and adhere to the tag.
Use a small piece of ribbon or some fibres to embellish the tag.
Attach the tag to your layout.

…and RELAX!!!


I hope you have enjoyed the class - please don't be shy about leaving comments for me - I love to hear from people :) (new friends and old ones alike!!! LOL )